첫 번째 클론 웹 (https://besthorrorscenes.com/)
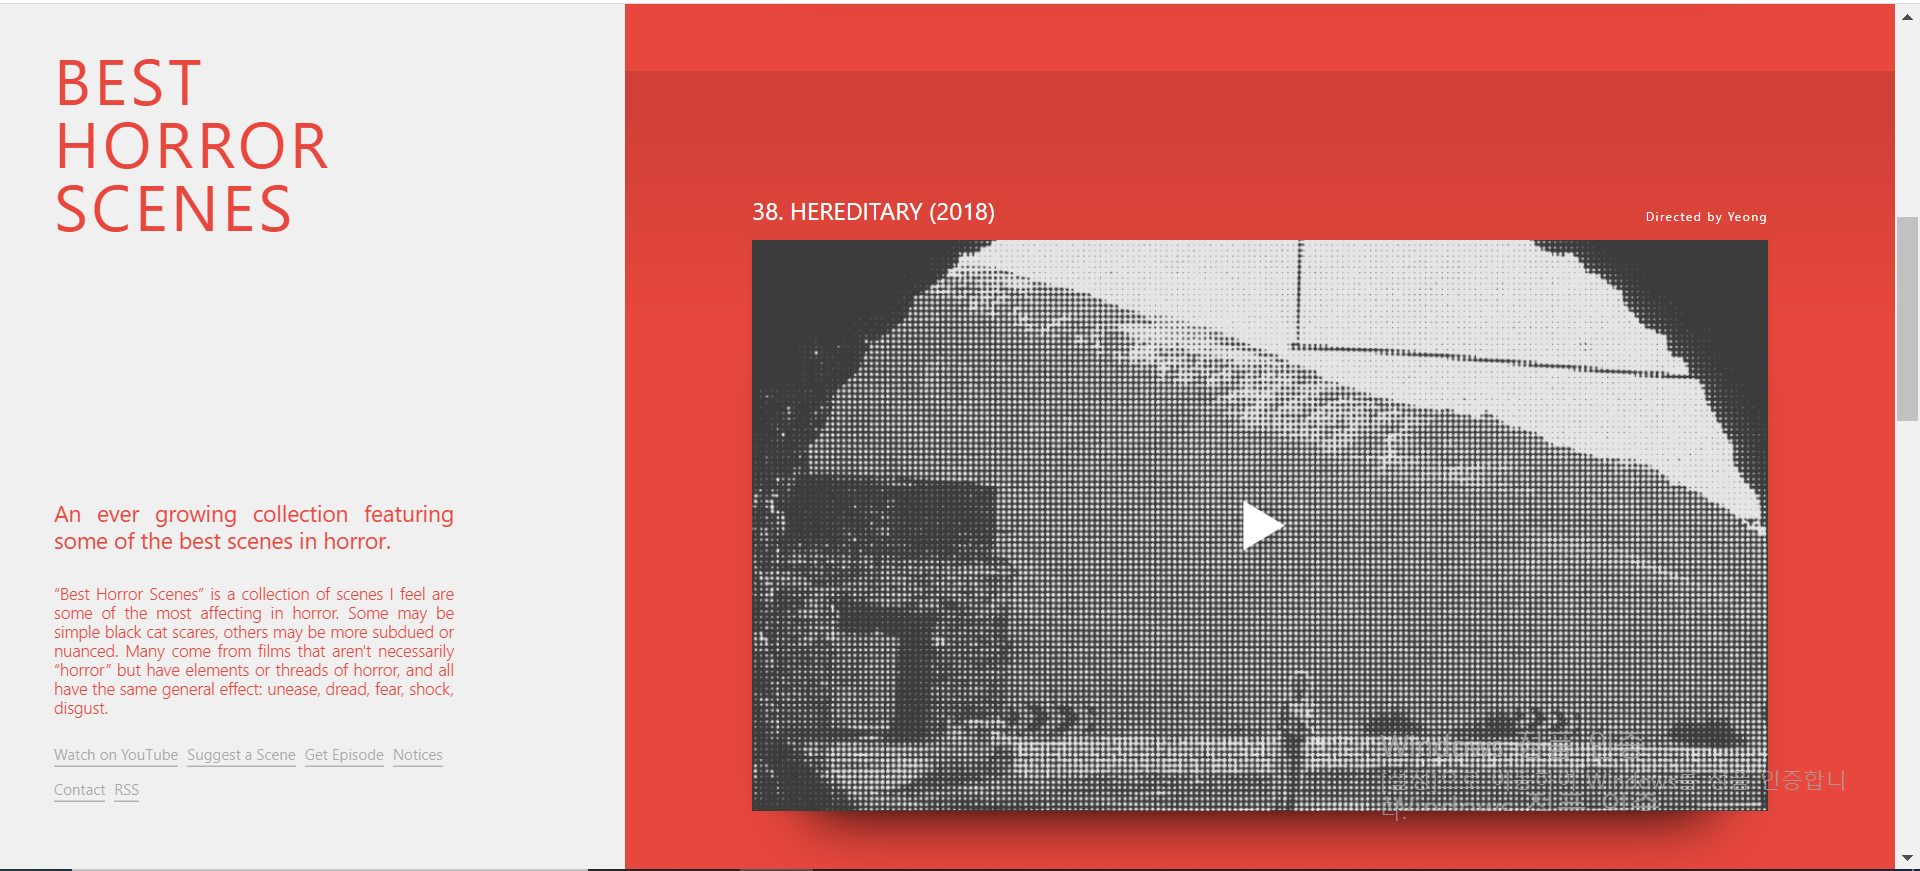
이제 부터는 기존의 웹페이지를 최대한 비슷하게 복제해보는 프로젝트이다. 처음 클론할 웹사이트는 위에 링크를 걸은 웹사이트인데 보면 왼쪽 nav 부분이 고정되어있고 오른쪽에는 영상이 나열되어 있는 보기에 간단한 웹페이지 이다. 그럼 뼈대를 만들어 주자. 이때 html 안에 어떤 부분에 어떤 태그를 사용했는지, 그리고 어떤 태그로 얼마만큼 감쌌는지 유심히 살펴보자.
1
2
3
4
5
6
7
8
9
10
11
12
13
14
15
16
17
18
19
20
21
22
23
24
25
26
27
28
29
30
31
32
33
34
35
36
37
38
39
40
41
42
43
44
45
46
47
48
49
50
51
52
53
54
55
56
57
58
59
60
61
62
63
64
65
66
67
68
69
70
71
72
<!-- head 부분은 생략 -->
<body>
  <header>
    <h1>BEST HORROR SCENES</h1>

    <div class="bottom">
      <h3>
        An ever growing collection featuring some of the best scenes in horror.
      </h3>

      <p>
        “Best Horror Scenes” is a collection of scenes I feel are some of the
        most affecting in horror. Some may be simple black cat scares, others
        may be more subdued or nuanced. Many come from films that aren't
        necessarily “horror” but have elements or threads of horror, and all
        have the same general effect: unease, dread, fear, shock, disgust.
      </p>

      <nav>
        <!-- 다른 곳으로 이동시키는 링크 페이지 설정 or 페이지 안에 구역을 나누는 태그 -->
        <ul>
          <li>Watch on YouTube</li>
          <li>Suggest a Scene</li>
          <li>Get Episode</li>
          <li>Notices</li>
          <li>Contact</li>
          <li>RSS</li>
        </ul>
        <!-- ul>li*숫자 하면 ul 안에 담긴 li 태그가 숫자만큼 생김 -->
      </nav>
    </div>
  </header>
  <main>
    <section class="movie">
      <div class="wrapper">
        <div class="movie_header">
          <h4>38. Hereditary (2018)</h4>
          <h5>Directed by Yeong</h5>
        </div>
        <img src="poster.png" alt="" />
      </div>
    </section>
    <section class="movie">
      <div class="wrapper">
        <div class="movie_header">
          <h4>38. Hereditary (2018)</h4>
          <h5>Directed by Yeong</h5>
        </div>
        <img src="poster.png" alt="" />
      </div>
    </section>
    <section class="movie">
      <div class="wrapper">
        <div class="movie_header">
          <h4>38. Hereditary (2018)</h4>
          <h5>Directed by Yeong</h5>
        </div>
        <img src="poster.png" alt="" />
      </div>
    </section>
    <section class="movie">
      <div class="wrapper">
        <div class="movie_header">
          <h4>38. Hereditary (2018)</h4>
          <h5>Directed by Yeong</h5>
        </div>
        <img src="poster.png" alt="" />
      </div>
    </section>
    <!-- 모든 텍스트에 태그를 달음. 그리고 세세하게 클래스를 설정함. 그래야 관리하기 쉬움 -->
  </main>
</body>
위에 html를 분석해보면 제목을 header 태그에 넣었고 밑에 contact 부분을 nav 태그에 넣었다. 그리고 영상들을 main 태그에 넣고 movie로 감쌌다. 또한 wrapper로 감싼다음 안에 영화 제목과 그림을 분류한 것을 볼 수 있다. 이러한 패턴은 뒤에서 다룰 클론웹에서 자주 등장하는 패턴이다.
그 다음 local에서 styles.scss 를 css로 변환하고 모니터 하기 위해 node를 켜 주자. npm run dev
scss 설정.
우선 배경색과 글자색을 반복해서 써야 하므로, 변수 설정이 필요하다. (변수를 설정해야 신속하게 코드를 작성할 수 있고 읽기도 쉬워지고 여러가지로 좋다.) _variables.scss 를 만들자.
1
2
3
$red: #e7473c;
$white: #f0f0f0;
$fixedWidth: 33%;
그리고 styles.scss 를 적어주자.
1
2
3
4
5
6
7
8
9
10
11
12
13
14
15
16
17
18
19
20
21
22
23
24
25
26
27
28
29
30
31
32
33
34
35
36
37
38
39
40
41
42
43
44
45
46
47
48
49
50
51
52
53
54
55
56
57
58
59
60
61
62
63
64
65
66
67
68
69
70
71
72
73
74
75
76
77
78
79
80
81
82
83
84
85
86
87
88
89
90
91
92
93
94
95
96
97
98
99
100
101
102
103
104
105
106
107
108
109
110
111
112
113
114
115
116
117
118
119
@import "_variables";
@import "reset";

// _variables 파일을 import 해야 변수를 사용 할 수 있다
// reset 파일은 html 을 표준화하는데 기여하는 파일이라서 import 해준다.

* {
  box-sizing: border-box;
  //padding 이랑 border 가 박스안에 담기도록 함.
  //두가지 element의 크기를 균일하게 할때 사용되는 property이다.
  // *는 universal selector 로 전체 스타일에 영향을 주는 선택자이다.
}

body {
  height: 100vh;
  font-family: -apple-system, BlinkMacSystemFont, "Segoe UI", Roboto, Oxygen,
    Ubuntu, Cantarell, "Open Sans", "Helvetica Neue", sans-serif;
  background-color: $white;
}

header {
  position: fixed; //header 가 fixed 되면 main의 margin-left 에 공간을 줘야 겹치지 않게 된다.
  top: 0;
  left: 0;
  width: $fixedWidth; // 페이지 설명 header가 왼쪽에 위치하도록 하게 함.
  height: 100%;
  padding: 5vh 0 72px 72px; //위에서 부터 오른쪽 방향으로 설정
  display: flex;
  flex-direction: column;
  justify-content: space-between;
  color: $red;
  h1 {
    font-size: 85px;
    letter-spacing: 5px;
    text-transform: uppercase;
    width: 50%;
  }
  h3 {
    margin-top: 40px;
    font-size: 30px;
    margin-bottom: 40px;
    // letter-spacing: 3px;
  }
  h3,
  p {
    width: 70%;
    line-height: 1.2; // 줄의 높이를 설정. 말그대로.
    text-align: justify; // 텍스트 위치 설정.
  }
  p {
    font-weight: 330;
    font-size: 22px;
    margin-bottom: 40px;
  }
  nav {
    width: 80%;
    ul {
      display: flex;
      flex-wrap: wrap;
      li {
        cursor: pointer;
        margin-right: 12px;
        font-size: 20px;
        opacity: 0.5; //투명도
        padding-bottom: 5px; //줄간격이 늘어남. 모든 li에 적용하니깐
        border-bottom: 2px solid rgba(0, 0, 0, 0.5);
        margin-bottom: 20px;
        color: #616165;
        &:hover {
          opacity: 1; //마우스를 갖다대니깐 더 진해짐. 하이라이트 효과. 이럴때 쓰는 구나!
        }
      }
    }
  }
}

main {
  background-color: $red;
  margin-left: $fixedWidth;
  .movie {
    background: linear-gradient(
        to bottom,
        rgba(0, 0, 0, 0.1) 5%,
        transparent,
        transparent,
        transparent,
        transparent
      ) // 아래로 갈수록 더 옅어짐 배경색이. .movie 맨위에서 5%가량에 살짝 검정색깔이 들어가게 함. 그리고 밑으로는 점점 투명하게 변한다.
      $red;
    height: 100vh;
    display: flex;
    justify-content: center;
    align-items: center;
    color: white;
    .wrapper {
      width: 80%;
      display: flex;
      flex-direction: column;
      .movie_header {
        display: flex;
        justify-content: space-between;
        align-items: flex-end;
        margin-bottom: 25px;
        h4 {
          font-size: 32px;
          text-transform: uppercase;
        }
        h5 {
          letter-spacing: 2px;
        }
      }
    }
    img {
      width: 100%;
      box-shadow: 0 80px 80px -80px #000, 0 0 12px rgba(0, 0, 0, 0.06),
        inset 0 0 0 1px rgba(0, 0, 0, 0.2);
    } // 영상뒷면에 그림자가 지게 하는 효과. horror 사이트 검색을 통해 찾아낸 효과.
  }
}
결과물